If you have ever done any research into preparing hemp plants for edible purposes, chances are you have heard about decarboxylation.
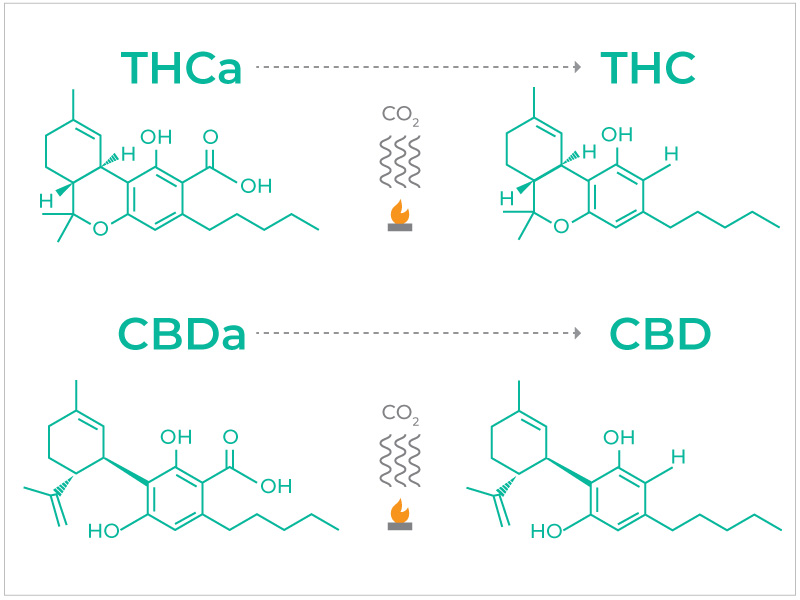
In scientific terms, it refers to a chemical reaction resulting in the removal of a carboxyl group and releasing carbon dioxide in the process.
In practical and meaningful terms for cannabinoid consumers, decarboxylation is how CBDa is converted into CBD (and THCa into THC, CBGa into CBG, etc.) and in the process activates the compounds so they can deliver the effects we appreciate (and sometimes need). An analogy may be to compare it to valuables contained in a locked case; decarboxylation is the key that reveals and releases the valuables within.
Quick Navigator
Top – Decarboxylating Cannabinoids – Guidelines for Decarboxylating – How to Decarb Kief – Your Decarboxylation Temperature Guide – After Decarboxylation – Optimize Your Decarboxylation Practice – Measuring the Potency of Decarboxylated Materials
Decarboxylating Cannabinoids
For hemp and cannabis plants, decarboxylation occurs in one of two ways: heat or time. Normally, heat is the agent that triggers the process. If time is the instigator, more often than not it is because someone forgot they had materials available for consumption; it also has lost its freshness which means many of the wonderful terpenes contained in the plant materials have also dissipated. If aged material is consumed, the cannabinoids and terpenes will still deliver effects but in a greatly reduced form.
For the large number of people that consume hemp (and cannabis) by either smoking or vaporizing the plant materials, they are effectively decarboxylating the cannabinoids and immediately consuming the end product (namely CBD, CBG, THC, or other converted cannabinoids).
But you can also decarboxylate your plant material and save it for later use; this is what people do if they want to make CBD-infused foods or beverages. In fact, it is essential that any plant materials you want to consume are decarboxylated in order for their beneficial properties to be released and have an effect.
Quick Navigator
Top – Decarboxylating Cannabinoids – Guidelines for Decarboxylating – How to Decarb Kief – Your Decarboxylation Temperature Guide – After Decarboxylation – Optimize Your Decarboxylation Practice – Measuring the Potency of Decarboxylated Materials
Guidelines for Decarboxylating Plant Materials
There is a wide range of decarboxylation levels possible.
Inhaling the smoke of combusted materials is a direct way to convert the materials into active compounds; the microscopic compounds cling to the smoke that is then inhaled into the lungs. Obviously, inhaling smoke fumes for the benefit of the microscopic cannabinoid oils floating in them is not highly efficient when it comes to purity but smoking is the most intense and maximal method of decarboxylation possible, with mostly ashes and smoke remaining afterward.
Not quite as intense is vaporizing the materials. You are still using very high heats (hotter than baking cookies in the oven) but the materials are not catching fire and burning. Instead, the high heat creates vapors to which those microscopic compounds hang on. No ashes are produced but instead, the materials become brown, dry, and crunchy… exactly what happens with decarboxylation but at an extreme level! (In fact, many veteran vapers save the materials that were vaped with the full knowledge that not all the cannabinoids were consumed. This material is perfect for infusing in oils or making edibles.)
We need to learn about decarboxylating materials at lower heat levels but first, let’s understand temperature ranges and their effect on hemp and cannabis plants.
What Is Too Hot?
Combustion of hemp or cannabis plant materials can begin at temps as low as 450° (if the material is very dry) but normal temps for combustion of fresher materials will range between 550° and 600°.
You can consider vaporizing as the next level below smoking since the materials are never combusted. However, they are still heated at a high enough level that the majority of the compounds will decarboxylate during the vaporization process.
In the hierarchy of which compounds will dissipate faster, terpenes will transform and be consumed before the majority of the cannabinoids. This results in more flavor at the beginning of a vaporizing session, the strength of which quickly diminishes after a few draws. (This is similar to smoking a pipe where the first draws contain more flavor than later ones; when the flavor diminishes, it does not mean the cannabinoids have been fully consumed but rather the terpenes that are mostly spent.)
Typical heating ranges for vaporizing plant materials will span between 350° and 425°. Again, the freshness of materials will influence how much heat is demanded to effectively vaporize it (with fresher material requiring higher temps by virtue of the increased moisture levels).
Considering that both smoking and vaping are intended to decarboxylate AND consume the cannabinoids and terpenes released by the heat, we can conclude that these are higher heat levels than required when decarboxylating materials to infuse cannabinoids in various food items, most especially oils.
What Is Just Right?
When it comes to determining the right temperature and length of time for decarboxylating hemp plant materials, the freshness of the material exposed to heated conditions will greatly impact the final results. Freshly harvested buds contain the most moisture; those buds will begin to slowly dry out (the length of time will vary depending upon storage practices and time elapsed since harvest).
Since vaporizing of plant materials can start as low as 350°, our maximum heat level for decarboxylating even the freshest of materials must be below this temperature: 300° is the recommended maximum heat setting you should use. As to the lower range for decarboxylating, the “warm” setting in the oven for reheating foods is about 240° so we’re going to bump that up 10° so that 250° is the recommended minimum heat setting for decarboxylating hemp plant materials.
This 50° temperature range will give you lots of leeway and options which helps as you factor freshness in your final calculation.
Assessing Freshness
The first step in deciding the best heat level is to assess freshness levels. Common sense dictates that fresher material means a higher moisture content which in turn equates to the need for a higher heat setting and/or a longer decarboxylation session.
Fortunately, you don’t need to be a scientist or own a fancy lab to determine freshness. Experienced hemp consumers can gently squeeze a bud between their fingers (many love to do that to tease out just a hint of the fabulous terpenes they will soon be enjoying!) and immediately know how fresh it is. The freshest buds have a spongy feel and after being squeezed, they will slowly return to their previous full, healthy shape.
Another way to determine freshness is how easy you can break up your flower with either a manual grinder or by hand. Grinding the freshest plant materials typically takes longer and results in more shredded material, perfect for smoking or vaporizing as its consistency allows for more air passages, making combustion for smoking or heating to the right temperature for vaping that much easier.
As buds start to dry out, grinding gets easier. The freshness may be slowly dissipating but you will still get nice fluffy mounds of ground-up material that will smoke and vaporize smoothly and thoroughly with lots of good flavors.
Really dry buds can be crumbled by hand with minimal difficulty but tend to result in a more powdery pile. While still combustible, powdery materials do not burn as evenly since there are fewer air passages to be found when heaped together. Instead, the outer portions of the material are more likely to combust while the inner pile is less affected by the heat.
Categorizing Freshness Levels
Your first rule of thumb for determining the right temp for your decarboxylation session should be to factor freshness into your calculations. To simplify matters, we used three broad categories for freshness, as follows (along with our recommended decarboxylation levels):
- Fresh – this is the quality of material that you buy from Fern Valley Farms; right after harvest, while the buds are fresh and moist, they are stored away in air-proof bags with a Boveda pack to shield and preserve the terpenes (you can’t get any fresher than this!) but it takes higher temps to combust (between 550° and 600°) for smoking or heat (between 400° and 425°) for vaping – decarboxylate for the maximum recommended time
- Mature – at this stage, anywhere between a week and a month after exposure to open air, the same material will begin to lose some of its moisture and spring; it still fluffs up and smokes or vaporizes nicely but it takes lower temps to combust (between 500° and 550°) or vaporize (between 375° and 400°) – decarboxylate between the minimum and maximum recommended times
- Aged – this is when materials can crumble by rolling them between fingers; there may be a modicum of fluffiness but the majority of the materials become powder-like; the lowest temps for combusting (between 450° and 500°) or vaping (between 350° and 375°) is all that is required but the results will be uneven, with some parts thoroughly combusted or vaped while other areas (usually the center of the heap) are less affected unless well-stirred after each round of puffing – decarboxylate for the minimum recommended time
Retaining Freshness
It’s true that nothing stays fresh forever, but there are tricks you can apply to sustain that fresh state. By employing common-sense practices, one can extend the freshness of their products for a longer time, even for materials you later plan to decarboxylate.
There are five elements that affect how long your hemp flower strains will stay fresh:
- Air – hemp may thrive on fresh air while it’s growing but once harvested that same oxygen triggers the oxidation process, where the potency, smell, and taste of your hemp will begin to diminish
- Humidity – hemp also needs a lot of moisture when growing but after the harvest excess humidity and moisture can cause mold and bacterial growth, so harvested plant materials should not be regularly exposed to areas with high humidity
- Light – direct sunshine and artificial light can wreak havoc on hemp flower strains, especially those beautiful buds almost dripping with trichomes; just as ripe fruits or vegetables sitting out in the open will stale, so too will hemp buds lose their fresh body and flavor
- Storage – generally, using containers or bags that can seal out air is the optimal method of keeping plant materials in their freshest state for the longest period of time; storing so as to avoid direct light and extreme or changing temperatures is best
- Temperature – avoiding wide fluctuations in temperature and both hot and cold temperature extremes is vital for keeping hemp flower strains in their best and healthiest condition; it must be remembered that no matter how carefully they were harvested (and rest assured, at FVF, they get the highest level of TLC during harvest!), the plants have undergone a mild shock, having transitioned from a growing living plant to material suitable for human consumption and wellness, so temperature gyrations can exacerbate its already traumatized condition
By monitoring and managing the five above conditions that can affect the freshness of your product, you can learn to optimally prolong the freshness of your hemp flower collection. Often, focusing on a reliable and solid storage solution can solve the other concerns of air, humidity, light, and temperature.
Quick Navigator
Top – Decarboxylating Cannabinoids – Guidelines for Decarboxylating – How To Decarb Kief – Your Decarboxylation Temperature Guide – After Decarboxylation – Optimize Your Decarboxylation Practice – Measuring the Potency of Decarboxylated Materials
How To Decarb Kief
We have already covered in-depth decarboxylating harvested plant materials because of the freshness variants involved. But there is another hemp product that can be decarboxylated: kief. You want to know how to decarb kief? Let’s jump right in!
If you want to decarboxylate any of our fabulous strains of hemp kief, we recommend performing the process for the entire amount of kief you ultimately intend to use in cooking. Once it has been decarboxylated, it can be stored in an airtight container in a cool dark cabinet (or similar space) for months without it losing its viability or potency when finally used in a recipe.
As an example, let’s say you plan to decarboxylate a ½ ounce of Super Sour Space Candy kief. This is a particularly wonderful and popular option; with a 20% CBD content, this Sativa dominant kief will give any edible an extra charge to help kickstart your day or evening.
As this product is already in a powdery form, albeit slightly moist and spongy, there is no need for grinding. Instead, you simply spread the kief on parchment paper or a sheet of lightly crinkled tin foil and slide it into the oven.
Yep, the preparation has all been done by Fern Valley Farms, so you can get right to the process. Thanks, FVF!
Quick Navigator
Top – Decarboxylating Cannabinoids – Guidelines for Decarboxylating – How to Decarb Kief – Your Decarboxylation Temperature Guide – After Decarboxylation – Optimize Your Decarboxylation Practice – Measuring the Potency of Decarboxylated Materials
Your Decarboxylation Temperature Guide
Now that we know how to determine the freshness of the material to be decarboxylated, we are better able to determine heat levels for decarboxylation of both hemp plant materials and kief.
There are two equally acceptable approaches to decarboxylation: using a higher heat for a shorter time or lower heat for a longer time.
By the way, we have been discussing decarboxylating materials containing CBD, not THC plant materials. The times differ slightly if you wish to decarboxylate THC plant materials (it takes a bit less time for THC than with CBD plant materials). For your convenience, our guide includes times for decarboxylating THC as well as CBD plant materials.
In all situations, a standard kitchen (gas or electric) oven is being used. As anyone who has done a smattering of cooking likely knows, each oven is different so during your first round of decarboxylation pay closer attention to the process to make sure you don’t overcook your materials. If necessary, make notes and adjustments as needed but remember that there is a lot of room for experimenting without harming your materials.
Here is your Decarboxylation Temperature Guide:
- Low Heat CBD Plant Materials – 250° for 60-90 minutes
- Low Heat CBD Kief – 250° for 40-50 minutes
- Low Heat THC Plant Materials – 250° for 50-60 minutes
- Low Heat THC Kief – 250° for 30-40 minutes
- High Heat CBD Plant Materials – 300° for 15-25 minutes
- High Heat CBD Kief – 300° for 10-15 minutes
- High Heat THC Plant Materials – 300° for 10-18 minutes
- High Heat THC Kief – 300° for 5-10 minutes
While you’re allowed some wiggle room on time, you should check your product at the earliest of the indicated time ranges.
You also cannot help but notice the significant reduction in time by choosing high heat but this also requires extra vigilance on your part to ensure you don’t overheat your materials and begin baking the materials you are preparing. If your materials start showing any charring or smoke, remove them immediately; you have reached the optimal decarboxylation point and any additional heat will start affecting the potency of your cannabinoids. Also, as the material turns browner in hue, you are getting closer to the completion of the decarboxylation process.
Quick Navigator
Top – Decarboxylating Cannabinoids – Guidelines for Decarboxylating – How to Decarb Kief – Your Decarboxylation Temperature Guide – After Decarboxylation – Optimize Your Decarboxylation Practice – Measuring the Potency of Decarboxylated Materials
After Decarboxylation
Admittedly, it seems like this requires a lot more explaining than performing the actual process but it’s important you understand the nuances and factors that can affect the end result of your efforts. In one way, it is an exact science because there are clear and specific steps that need to be followed but on the other hand, there are no hard and fast measurements or temperatures you must memorize or stick to. Practice will make perfect as you get the knack of preparing the material, understanding your oven, and recognizing peak decarboxylation states.
(We offer the same recommendation about decarboxylation as we do when trying certain of our more potent products, such as our Delta 8 line: go low and slow until you get the hang of it. That way you will be less likely to get frustrated plus you give yourself time to practice.)
Once you have decarboxylated your materials, you can either store them for later use or dive right into creating your own edibles.
Storage is pretty quick and easy. Your best bet is to use an airtight container and to put it away in a dark cool area.
If you want to get cooking, there are several avenues you can follow.
Infusion
First, and by far most popular, is infusing your decarboxylated materials into edible oil. The most common and popular oils you will find being used for the infusion process are:
- Butter
- Coconut Oil
- Olive Oil
- Vegetable Oil
Nowadays, adventurous cooks are also experimenting with more unusual items such as:
- Avocado Oil
- Canola Oil
- Flaxseed Oil
- Peanut Oil
- Sesame Oil
- Soybean Oil
- Sunflower Oil
- Walnut Oil
Seasonings
Another option is to treat your materials like seasoning, just like you do with other dried herbs. In this instance, you want your material broken up in a similar form as other herbal seasonings.
Flour Additive
Finally, you can grind up your decarboxylated plant material into a fluffy powder and can add it to any recipe calling for flour; a ratio of 3:1 (flour to decarboxylated plant material) is recommended. (Decarboxylated kief is already in that state, thanks to Fern Valley Farms and a quick tan in the oven!)
Quick Navigator
Top – Decarboxylating Cannabinoids – Guidelines for Decarboxylating – How to Decarb Kief – Your Decarboxylation Temperature Guide – After Decarboxylation – Optimize Your Decarboxylation Practice – Measuring the Potency of Decarboxylated Materials
Optimize Your Decarboxylation Practice
We have already mentioned that practice makes perfect; we also urge patience for newcomers to the process. We also can offer a few suggestions that will help you gain experience faster with fewer hiccups along the way.
Be Consistent
As you have learned, there are several approaches to decarboxylating materials with general guidelines. This means you can and should develop your own method and style instead of trying to reinvent the wheel each time. Once you make what you deem to be a successful batch of decarboxylated materials, not only congratulate yourself but take note of what you did and be sure to do the same thing in the future.
Another way to be consistent is in the selection of your materials. By relying upon Fern Valley Farms for all of your decarboxylation materials, you will consistently obtain the same high-quality materials, whether you are purchasing our smalls or our ever-popular shake/trim to get the job done.
Label Stored Materials
If you do decide to store any of your decarboxylated materials, be sure to properly and thoroughly label each batch of decarboxylated material clearly so they are easy to select for later use. A good label will ideally contain the following information:
- Date PreparedWeight
- Potency (as %)
- Effect (Indica, Hybrid, or Sativa)
- Cannabinoid(s) Included
With this information in front of you, you can readily and accurately choose the right batch of materials for your next project.
Label Edible Goods
Likewise, anything you plan to consume should offer general consumption information. Your edible food labels should offer the following information:
- Date PreparedProduct (i.e., brownie, cookie, etc.)
- Potency (mg per edible piece)
- Effect (Indica, Hybrid, or Sativa)
- Cannabinoid(s) Used
Quick Navigator
Top – Decarboxylating Cannabinoids – Guidelines for Decarboxylating – How to Decarb Kief – Your Decarboxylation Temperature Guide – After Decarboxylation – Optimize Your Decarboxylation Practice – Measuring the Potency of Decarboxylated Materials
Measuring the Potency of Decarboxylated Materials
It’s fun making your own edibles but it also helps to note the level of cannabinoids in the goods you create.
The first question you may have is: if I convert 100mg of CBDa into CBD, how many milligrams of CBD will there be after decarboxylating?
First off, because the heat eliminates most of the moisture during the decarboxylation process, logic dictates that the end result will be lighter than the original materials. But something else happens during decarboxylation: the CBD molecule is less heavy (about 88%) than the CBDa molecule from which it transforms.
With that knowledge in hand, our handy calculator reveals that 100mg of properly decarboxylated CBDa should result in about 88mg of CBD. Interestingly, the weight loss after decarboxylation is also close to that same percentage meaning you generally end with the same percentage of CBD but the materials weigh 10% to 12% lighter than before.
Measuring Three Versions of Super Sour Space Candy
Granted, that was simpler than most calculations you will need to perform, so let’s construct three real-world examples you could very likely use in your own decarboxylation practice:
- ¼ ounce of Super Sour Space Candy smalls (17.09% CBD)
- ½ ounce of Super Sour Space Candy shake/trim (14.78% CBD)
- ½ ounce of Super Sour Space Candy kief (20% CBD)
The minor differences in CBD potency between these three kinds of the same strain can be attributed to the fact that shake/trim holds fewer (and smaller) buds than do the smalls. Since buds contain the majority of cannabinoids, the small buds would naturally result in a higher CBD count. Likewise, the CBD count for kief runs higher than buds due to the denser concentration of materials.
Measuring the Potency of SSSC Smalls
We chose a ¼ ounce quantity of the smalls because they offer a slightly higher CBD count than the shake/trim counterpart of the same strain. It is not twice as high though, so the decarboxylated materials will end up with a lower CBD count than the shake/trim version.
Here’s the math:
- There are 7 grams in a ¼ ounce and since each gram weights 1,000mg, we start with 7000mg of hemp smalls
- The CBD content for Super Sour Space Candy smalls is 17.09%; multiply the 7000mg by 17.09% to discover total CBD content in the ¼ ounce: 1,196mg of CBD
- The 1,196mg of CBD is the measure BEFORE decarboxylation so it needs to be adjusted to 88% of its original measure: 1,052mg of CBD
- Remember that decarboxylation removes moisture (about 12% of total weight), so those 7 grams will become about 6 ⅛ grams of decarboxylated material
- Finally, that 6 ⅛ grams contains 1,052mg of CBD; to find the CBD percentage per gram, divide 1052 by 6125mg (6 ⅛ grams) for a result of 17.18% CBD
Measuring the Potency of SSSC Shake/Trim
We will work with a ½ ounce of shake/trim.
Here’s the math:
- There are 14 grams in a ½ ounce and since each gram weights 1,000mg, we start with 14000mg of Super Sour Space Candy shake/trim
- The CBD content for hemp smalls is 14.78%; multiply the 14000mg by 14.78% to discover total CBD content in the ½ ounce: 2,069mg of CBD
- The 2,069mg of CBD is the measure BEFORE decarboxylation so it needs to be adjusted to 88% of its original measure: 1,820mg of CBD
- Remember that decarboxylation removes moisture (about 12% of total weight), so those 14 grams will become about 12 ¼ grams of decarboxylated material
- Finally, that 12 ¼ grams contain 1,820mg of CBD; to find the CBD percentage per gram, divide 1820 by 12250mg (12 ¼ grams) for a result of 14.85% CBD
Measuring the Potency of SSSC Kief
In our final example, we are using a ½ ounce of Super Sour Space Candy kief.
Here’s the math:
- There are 14 grams in a ½ ounce and since each gram weights 1,000mg, we start with 14000mg of hemp smalls
- The CBD content for Super Sour Space Candy kief is 20%, so we multiply the 14000mg by that percentage to discover total CBD content in the ½ ounce: 2,800mg of CBD
- The 2,800mg of CBD is the measure BEFORE decarboxylation so it needs to be adjusted to 88% of its original measure: 2,464mg of CBD
- Remember that decarboxylation removes moisture (about 12% of total weight), so those 14 grams will become about 12 ¼ grams of decarboxylated material
- Finally, that 12 ¼ grams contain 2,464mg of CBD; to find the CBD percentage per gram, divide 2464 by 12250mg (12 ¼ grams) for a result of 20.11% CBD
By knowing the percentage and amount of milligrams in your decarboxylated materials, you will have a better idea of how much you want to use when cooking with them.
Keeping It Simple
We can simplify the above 5-step potency measurement process into a simpler two-step calculation and still get a fairly accurate measure of potency (we will use a ½ ounce of material with 14.78% CBD):
- Adjust the ½ ounce of material by 88% to reflect the effect of decarboxylation; 14 grams (or 14000mg) X 88% = 12.32 grams (or 12320mg) of decarboxylated material
- Use the same CBD percentage as the original material (14.78%) to figure out how many milligrams are in your prepared material; 12320mg X 14.78% = 1820mg of CBD in your decarboxylated material
With that number in hand, when you prepare foods or infuse oils you will have a close estimate (say within 5%) of the cannabinoids being used. That helps you in preparing the strengths you want for each recipe you make.
Keep in mind that while 1820mg of CBD is more than anyone needs in one sitting, the edible you create will likely result in two or three dozen individual servings. At two dozen servings, you have 24 pieces; if 1820mg of CBD went into the recipe, each serving would contain about 75mg of CBD, an excellent amount without overdoing it.
Now it’s your turn to hit the kitchen and decarboxylate your own hemp flower. Of course, at Fern Valley Farms we make it even easier by providing both smalls and shake/trim in nearly every strain we have. Our awesomely low prices for our shake/trim selection, allows you to purchase scads of plant material at super low prices.
Now you can experiment to your heart’s content without breaking the bank! Not to mention building a delicious food pantry stuffed with cannabinoid-filled yummies! Enjoy!
Quick Navigator
Top – Decarboxylating Cannabinoids – Guidelines for Decarboxylating – How To Decarb Kief – Your Decarboxylation Temperature Guide – After Decarboxylation – Optimize Your Decarboxylation Practice – Measuring the Potency of Decarboxylated Materials
